 by J. Robertson Macaulay D. Young
Updated On Apr 30, 2024
Published On Sep 5, 2023
Basic iPhone Tips Ideal for Newbies
by J. Robertson Macaulay D. Young
Updated On Apr 30, 2024
Published On Sep 5, 2023
Basic iPhone Tips Ideal for Newbies
Tired of your device being restricted by an MDM profile? Well, if you no longer work for the organization or acquired it from someone who did, it's time to remove the MDM profile and use your device to its full potential.
However, what do you do if you find there isn't an option for you to remove the MDM file? Fret not, because in this guide, we will show you: why there is no option to remove the MDM profile, how the administrator makes the MDM profile non-removable, and how to remove the MDM profile if there is no option from settings.
Let's get to it so you can start using your device the way you want to!
There are a few reasons why you might not be able to find the option to remove MDM profile from settings on your device:
The main reason there isn't an option to remove the MDM profile is that the IT department, which enrolled the MDM on your device, has configured a setting called "Locked enrollment" to "Yes" in the Apple enrollment profile. This setting essentially restricts users from removing the MDM profile from settings on their iPhones.
Another possibility is that you may be looking in the wrong place to find the option to remove the MDM profile. It should be located under Settings > General > VPN & Device Management on your iPhone.

Apple allows you to make an MDM (Mobile Device Management) profile non-removable on iOS devices, but certain conditions must be met:
To configure a non-removable MDM profile using Apple DEP:
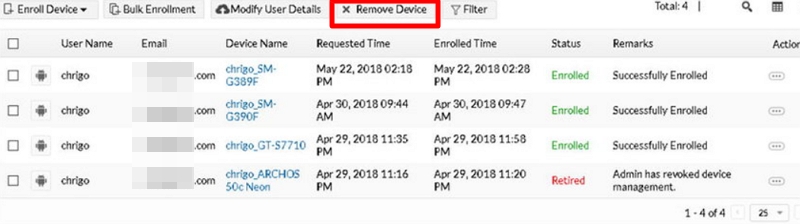
What happens on the device's end? The option to remove MDM profiles from the device can usually be found under Settings > General > VPN & Device Management. To delete a profile, users typically click on the profile and select Remove Management.

On the device's end, the option to remove MDM profiles is typically found under Settings > General > VPN & Device Management. Users can delete a profile by clicking on it and selecting "Remove Management."
However, when you apply the configuration to make the MDM profile non-removable, this option will no longer be available to the user.
Unlockit iPhone is a highly recommended solution for addressing the issue of not having the option to remove an MDM (Mobile Device Management) profile. This tool not only allows you to bypass the MDM profile without needing a passcode but also enables you to bypass the Remote Management on your iPhone and iPad. It's fully compatible with the latest iOS version, including iOS 17.
Here are the steps to use Unlockit iPhone to solve the "no option to remove MDM profile" problem:
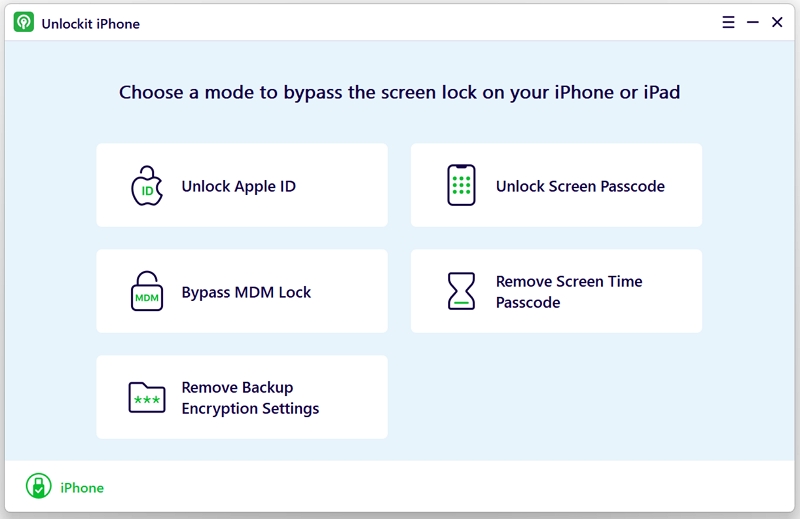
Step 1. Install Unlockit iPhone on Your Computer
Ensure that you have successfully installed Unlockit iPhone on your computer. Run the program and then click on the "Bypass MDM Lock" option.
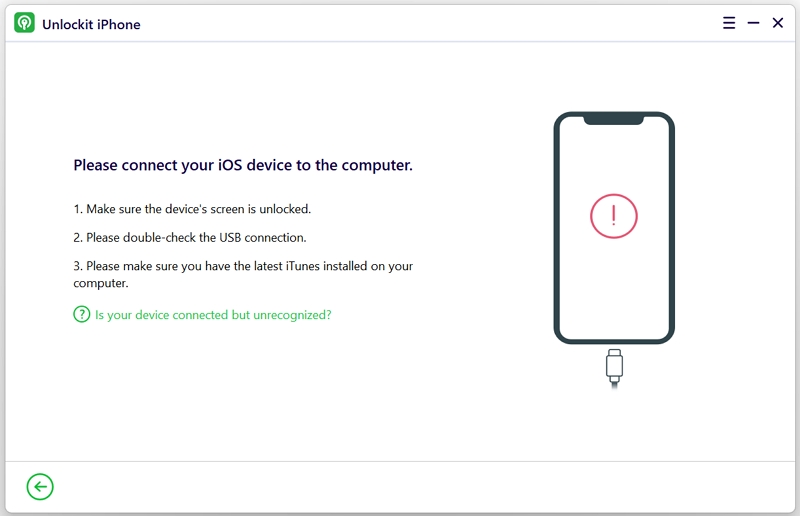
Step 2. Connect Your iPhone
Connect your iPhone to your computer via a USB cable.
Step 3. MDM Bypass Process
Once Unlockit iPhone detects your iPhone, click on the "Start" button. The program will begin bypassing the MDM lock. Please be patient and allow the software to complete its work.

Step 4. Successful Removal
Once you see a screen confirming the successful removal of the MDM profile, it means the task is complete. Unlockit iPhone offers an effective way to resolve MDM profile issues on your iOS device, ensuring that you can manage your device more freely.

Pros:
Cons:
If your iOS device is equipped with older chips like A9, A10, or A11, you may consider jailbreaking it to remove the MDM restrictions. Removing MDM from your iPhone via jailbreaking is a procedure that involves bypassing the software limitations set by Apple on iOS devices.
By jailbreaking your device, you can delve into the device's file system and install third-party applications not typically found on the App Store, thereby bypassing MDM restrictions. Here's how to do it:
Step 1: Install "Filza" and Jailbreak Your iPhone
Begin by installing a "Filza" file manager and performing the jailbreaking process on your iPhone.
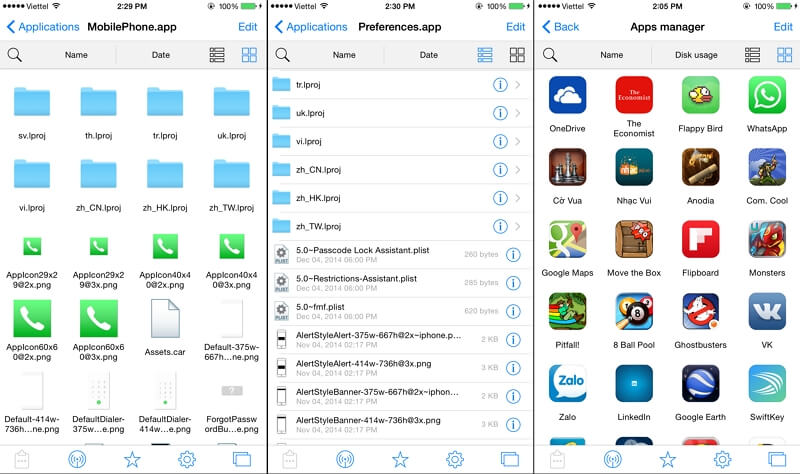
Step 2: Use "Filza" to Navigate to a Specific Directory
Inside "Filza," navigate to the following directory: /var/containers/Shared/systemgroup.com.apple.configurationprofiles/Library/ConfigurationProfiles/
Step 3: Locate and Delete "MDM" Files
Locate and delete the "MDM" files in the directory mentioned above. Exercise caution to avoid deleting any other crucial system files.
Step 4: Restart Your iPhone or iPad
After deleting the MDM files, restart your iPhone or iPad to ensure that the changes take effect.
Pros:
Cons:
Another method for removing the MDM profile from your iPhone involves contacting the IT department of the organization that enrolled your device in the MDM program. They can assist in removing the profile. However, if this isn't possible for any reason, you can follow these steps:
Pros:
Cons:
No need to worry! Removing the MDM (Mobile Device Management) profile via the device's Settings only removes the profile itself, so there won't be any data loss. Similarly, using Unlockit iPhone to remove the MDM profile should also keep your data intact as much as possible.
However, if you want to ensure the safest possible process, it's a good idea to back up your iPhone before proceeding with the removal. This backup can provide extra protection for your data in case anything unexpected happens during the MDM removal process.
Actually, the 'Settings > General > Reset > Erase All Content and Settings' option simply resets your phone to its factory settings, erasing all your data and settings. It will not help you with the MDM profile removal.
To eliminate the MDM restriction, you can follow the method mentioned earlier using Unlockit iPhone. It's just one of the steps you should take before bypassing the MDM solution. The good news is that you can remove MDM without losing your data.
Although there may be many ways to remove the MDM profile from your device, using a professional tool like Unlockit iPhone is the best option. First, it doesn't require you to rely on the administration or IT department.
Similarly, you don't have to jailbreak your device and expose it to external threats. With a professional bypass tool, you can easily get rid of the MDM profile while protecting your device and its data. I would choose Unlockit iPhone, would you?

Mako is a technical writer with a passion for all things tech. Whether you're wondering about how to fix your iPhone or Android device or trying to get something to work in your settings, Mako is your go-to for professional help. He loves writing, testing solutions, and most of all, making sure his research is factually accurate.