Hot Topics
 by Maggie Mueller
Updated On Nov 30, 2024
Published On Nov 30, 2024
Basic iPhone Tips Ideal for Newbies
One of the most frustrating issues iPhone users encounter is when the device refuses to turn on. You press the power button, expecting it to spring to life, but nothing happens. If you're facing this issue, don't despair—there are solutions available.
In this comprehensive guide, we'll explore 8 effective solutions to fix an iPhone that won't turn on. Before diving into these fixes, let's examine the common reasons why this issue occurs.
Understanding the cause of the problem can make it easier to implement the right solution and prevent the issue from recurring in the future. Below are the most common reasons your iPhone might fail to power on:
A drained battery is one of the most frequent causes of an iPhone not turning on. All devices require a certain charge level to operate, and iPhones are no exception. Over time, battery performance naturally declines, meaning older devices may need more frequent charging. If your iPhone's battery health is significantly degraded, replacing it might be the best option to restore functionality.
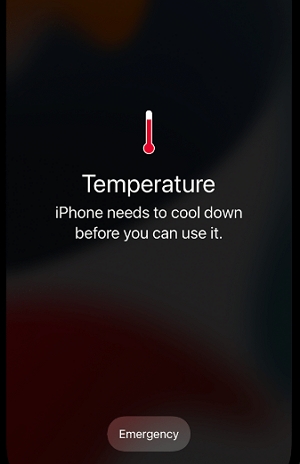
When an iPhone overheats, it might shut down automatically to protect internal components. Overheating can occur due to prolonged exposure to sunlight, heavy app usage, or charging with incompatible accessories.
Physical damage, such as dropping your iPhone, can harm its internal components, making it unable to turn on. Water damage is another common culprit. While newer iPhones are water-resistant, this protection is not foolproof. Over time, seals may wear down, allowing moisture to infiltrate and disrupt internal circuits.
Software glitches can cause an iPhone to become unresponsive. These issues often arise after system updates or app installations. For instance, the device may freeze during startup, remaining stuck on the Apple logo.
Jailbreaking an iPhone, while offering enhanced customization, can lead to security vulnerabilities and software instability. This instability can cause the device to malfunction or fail to boot up altogether.
If your iPhone has overheated, allow it to cool to a safe operating temperature. Place it on a flat, cool surface away from direct sunlight. If your iPhone has a case, remove it to improve ventilation. Avoid drastic measures such as placing your iPhone in a refrigerator or freezer, as this can cause permanent damage to its components.

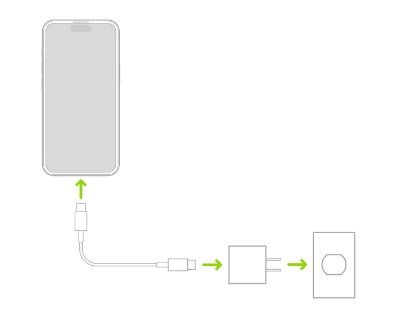
If overheating isn't the issue, check whether your iPhone has sufficient charge:

Sometimes, your iPhone may appear off, but it's actually unresponsive due to a software glitch. Once the iPhone is sufficiently charged, try restarting it.
For iPhones with Face ID:
For iPhones with a Home button:

If a restart doesn't resolve the issue, a force restart might help. This method clears temporary glitches without affecting your data. The steps to hard reset vary slightly by model:
iPhone 8 and Later:

For iPhone 7 and iPhone 7 Plus:

For iPhone 6s, iPhone SE (1st generation), and older models:

For persistent software issues, consider using a specialized iOS repair tool like TinyFix iOS System Repair. This program can resolve complex iOS glitches, including iPhones that won't turn on without losing data. The following are the main features of TinyFix iOS System Repair:
Here's how to use TinyFix iOS System Repair:
Step 1: Download and install TinyFix on your computer.
Step 2: Start by connecting the iPhone to the computer using a USB cable. Open TinyFix iOS System Repair and in the main window, select "iOS System Repair" > "Standard Repair" to begin the process.

Step 3: The program will prompt you to put the device in recovery mode. Just follow the on-screen instructions to do that.

Step 4: Once the device is in recovery mode, verify that the information about your device is correct, and then click on the "Download" button to begin downloading the firmware needed to repair the device.

Step 5: When the download is complete, click on the "Fix Now" button and TinyFix iOS System Repair will begin fixing the device. Keep the device connected to the computer until the repair process is complete.

For severe software issues, a DFU restore is a last resort. DFU (Device Firmware Update) mode allows your device to communicate with iTunes or Finder without loading the iOS operating system. Here's how to do it:
Step 1. Connect your iPhone to a computer using a certified Lightning cable.
Step 2. Open iTunes (Windows or macOS Mojave and earlier) or Finder (macOS Catalina and later).
Step 3. Enter DFU mode:
Step 4. Follow on-screen instructions to restore your iPhone.
Note: DFU restores erase all data on your device, so back up your information beforehand if possible.

If the problem recurs even after restoring the device several times, the issue may be the battery. A degraded battery can prevent the device from turning on. In this case, the best solution is to replace the battery. However, we don't recommend attempting this yourself, as it may cause further damage to the device.
Instead, take your iPhone to the nearest Apple Store, where a technician can check if the battery is the issue and replace it if necessary. If your device is relatively new and still under warranty or covered by AppleCare+, the replacement will be free. Otherwise, you may need to pay between $70 and $120 for the replacement.
If physical or water damage is suspected, inspect your iPhone for visible signs of damage. To confirm whether the issue is hardware-related:
Connect your iPhone to a computer using a Lightning cable, and open iTunes or Finder and check if your iPhone is recognized.
If iTunes detects the device, then the iPhone is on and you should create a backup. Click on the Summary Tab and then select "Back up Now" to create a backup you can restore data from once the device is repaired.
An iPhone that refuses to turn on can be alarming, but with the right approach, most issues can be resolved. Whether it's a drained battery, software glitch, or hardware issue, the solutions outlined above offer a step-by-step guide to getting your device back in working order.
For software-related problems, tools like TinyFix iOS System Repair provide a user-friendly way to resolve issues without risking data loss. For hardware damage, professional assistance is always recommended to ensure proper repairs.
By understanding the potential causes and knowing how to troubleshoot, you can minimize downtime and keep your iPhone running smoothly for years to come.
